Roster Tags
Not counted towards your tag license limit.
It is not necessary for users to have the Tag Modification privilege to update modem contacts. Grant the Edit Roster Contacts privilege to users who need to update the contact list, but who should not otherwise be able to modify tags.
Legacy applications used the Manual Data or Tag Parameter View privilege. Accounts with those privileges will be granted the Edit Roster Contacts privilege on upgrade. The older privileges will no longer serve to modify the roster.
Roster tags are designed to work with the Alarm Notification system. Using a Roster tag, you may configure contact information for up to 39 operators. When a Roster tag has been enabled, the notification system will contact the operators in order in the event that an alarm has been triggered and has gone unacknowledged for a user-defined period of time. The notification system will continue to contact the operators on the active Roster tag until the alarm has been acknowledged.
Roster tags do not work alone. You also need a way for notifications to be sent (Modem tag, SMS Appliance tag, email server, Twilio account, VOIP system, or pager system) and configuration of the Alarm Notification System properties .
Area Property and Roster Tags
The Area field, selected during configuration, is especially important for Roster tags. The Area field is used by VTScada to link the Roster to alarms with the same area. If more than one Roster shares the an area, only one can be active at a time. The active Roster Tag in an area is always the one most recently activated - all other Roster tags with the same area property are automatically deactivated when one is activated. (See: Roster Selection Hierarchy)
In general, Roster tags should use the area, Default, unless you intend to send different sets of alarms to different operators.
If a Roster is a child of a custom AlarmDatabase, it will notify for alarms only from that database rather than all. Alarms with a matching Area property but under other AlarmDatabases will not be sent out by this Roster.
You may switch to the legacy behavior where all AlarmDatabases are searched, but this will be slower if you have a large number of AlarmDatabase tags. See: LimitRosterToParentDB
Default Call-Out Off Roster
One Roster Tag, the Default Call-Out Off Roster, is configured in every VTScada system. No names should be added to this roster. Its purpose is to provide a means of telling VTScada to not notify anyone. Because only one roster in an area can be active at a time, if the roster that is active has no names attached, no one will be notified.
Whether existing alarms are sent to a roster as it becomes active depends on the configuration of the rosters.
Alarms are not transferred: Given two rosters, the first having no contacts (since operators are assumed to be on-site) and the second having a list of contacts for when operators are not on-site. As the second roster becomes active, existing alarms are not sent to it.
Alarms are transferred: Given two rosters, each of which has a list of contacts. As the second roster becomes active, existing alarms that were being called out to the now-inactive roster will switch to the currently active roster.
If your system includes more than one modem, and those modems are attached to servers located in regions with different area codes, then you must use the 1 for each phone number and you must configure the server's location within the Windows™ Phone and Modem Settings dialog.
"9" - Internal vs external phone lines
In the event that you must configure a Roster tag to include the prefix "9" from some workstations, but not others, you should use the Modem Settings dialog in the Windows Control Panel.
On a computer that requires the 9:
- Open the Control Panel.
- Open the Phone and Modem Options dialog.
- Select the Dialing Rules tab.
- Click, Edit.
- Ensure that the area code is set.
- In the appropriate boxes, enter the number "9".
- Click Apply and close.
- In the Roster configuration, ensure that you use canonical phone numbers.
Phone number formatting matters. You must use a format that is acceptable for whichever service provider or device you have opted to use. You are generally safe using the E.164 standard of canonical phone numbers
Microsoft Azure Active Directory app registration, an OAuth 2.0 provider., however, you are advised to check your device manual or check with your service provider to confirm their formatting rules.
Roster Control Using Properties
Script a Custom View of a Roster (For advanced developers only.)
The ID tab of every tag includes the same common elements: Name, Area, Description, and Help ID.
Name:
Uniquely identifies each tag in the application. If the tag is a child of another, the parent names will be displayed in a separate area before the name field.
You may right-click on the tag's name to add or remove a conditional start expression.
Area
The area field is used to group similar tags together. By defining an area, you make it possible to:
- Filter for particular tag groups when searching in the tag browser.
- Link dial-out alarm rosters to Alarm tags having a particular area.
- Limit the number of tags loaded upon startup.
- Filter the alarm display to show only certain areas.
- Filter tag selection by area when building reports.
When working with Parent-Child tag structures, the area property of all child tags will automatically match the configured area of a parent. Naturally, you can change any tag's area as required. In the case of a child tag, the field background will turn yellow to indicate that you have applied an override. (Orange in the case of user-defined types. Refer to Configuration Field Colors).
To use the area field effectively, you might consider setting the same Area for each I/O driver and its related I/O tags to group all the tags representing the equipment processes installed at each I/O device. You might also consider naming the Area property for the physical location of the tag (i.e. a station or name of a landmark near the location of the I/O device). For serial port or Roster tags, you might configure the Area property according to the purpose of each tag, such as System or Communications.
You may define as many areas as you wish and you may leave the area blank for some tags (note that for Modem tags that are to be used with the Alarm Notification System, it is actually required that the area field be left blank).
To define a new area, type the name in the field. It will immediately be added. To use an existing area, use the drop-down list feature. Re-typing an existing area name is not recommended since a typo or misspelling will result in a second area being created.
There is no tool to remove an area name from VTScada since such a tool is unnecessary. An area definition will exist as long as any tag uses it and will stop existing when no tag uses it (following the next re-start).
Description
Tag names tend to be brief. The description field provides a way to give each tag a human-friendly note describing its purpose. While not mandatory, the description is highly recommended.
Tag descriptions are displayed in the tag browser, in the list of tags to be selected for a report and also on-screen when the operator holds the pointer over the tag’s widget. For installations that use the Alarm Notification System, the description will be spoken when identifying the tag that caused the alarm.
The description field will store up to 65,500 characters, but this will exceed the practical limits of what can be displayed on-screen.
This note is relevant only to those with a multilingual user interface:
When editing any textual parameter (description, area, engineering units...) always work in the phrase editor. Any changes made directly to the textual parameter will result in a new phrase being created rather than the existing phrase being changed.
In a unilingual application this makes no difference, but in a multilingual application it is regarded as poor practice.
Help Search Key
Used only by those who have created their own CHM-format context sensitive help files to accompany their application.
The Contacts tab for a Roster tag is used to create the list of people who will be notified, and to define how to reach each of them. The available methods include voice (a phone call) email, pager, text message, or text as a compact email via your cellular provider.
Use the [+] Add Contact button to create a new contact row.
The Contact List
Add both contacts and delay/repeat rules using the plus buttons at the lower left of the Contacts panel.
Each is added as a row in the list. The list can hold up to 39 contacts, each with its own delay or repeat rule. If there is no explicit delay rule between contacts, then there is no delay.
Blank contact rows are not saved and VTScada will perform basic error-checking of email address formatting. In general though, it is up to you to ensure that you have complete and accurate information for how to contact each operator. Use care when defining your roster.
Change the order of contacts and rules in the list by selecting a row then using the up or down arrows below the list. Delay/repeat rules apply to all preceding contacts, as marked by an arrow. Delay/repeat rules cannot be consecutive - every rule must be preceded by one or more contacts.
Use options within the Settings tab to choose whether to repeat the entire roster or stop after an attempt has been made to reach each active contact.
Each contact row contains the following columns:
Method
A drop-down selection of Voice, Pager, Email, Text message, or Compact email. You may need to click in the Method field to reveal the selection tool. Only contact methods that are configured can be used.
Name
Any name that you wish to provide to identify the contact. If the same operator can be contacted in different ways then you might include that information in the Name field.
Phone Number / Email addresses
Voice lines: Enter the contact’s phone number, using only the digits. If your phone systems requires a 9 to access an outside line, you will need to configure your modem options using the Windows™ control panel.
If your system includes more than one modem, and those modems are attached to servers located in regions with different area codes, then you must use the Canonical Address Format for each phone number and you must configure the server's location within the Windows™ Phone and Modem Settings dialog.
Pagers: The Phone Number field requires the paging company’s T.A.P. Modem Number (TAP = Telocator Alphanumeric Protocol). This number enables access to the alphanumeric paging network, enabling VTScada to send a message to the pager phone/PIN. The correct number for the Phone Number field can be obtained from your paging company’s technical support team.
Email addresses: If the selected contact mode is email, this field will be used for email addresses rather than phone numbers. You may enter several addresses, using a semi-colon between each.
Email Aliases
You may add a list of email aliases, from which acknowledgments will be accepted. This is useful when an operator has forwarded one or more email accounts to another that is used more often. Use a colon character to separate the list of email addresses to which the alarm will be sent from the list of email addresses that are acceptable aliases for those accounts. There is no need to add an alias address if the operator will reply from one of the addresses to which the notification is sent.
- A semicolon ; between addresses: Send a notification to each
- A colon : between addresses: Notify the first and accept a response from the following.
Example 1 - A simple configuration.
JoeOperator@CountyUtility.com
Example 2 - Configured with multiple addresses for one operator. A notification is sent to both addresses. Joe can acknowledge from either.
JoeOperator@CountyUtility.com;JoeOperator@GigaMail.com
Example 3 - Joe has forwarded his CountyUtility account to his GigaMail account. Notification is sent to his CountyUtility account, but Joe reads and acknowledges the alarm using his GigaMail account.
JoeOperator@CountyUtility.com:JoeOperator@GigaMail.com
While there is no limit on the number of email addresses you may have, the combined total number of characters may not exceed 255.
For those using Realm Filtering: Each contact user name in the roster that belongs to a realm must include the full realm qualifier. For example: WestRealm:Robert
Pager PIN
This field is used only with the pager communication method. A PIN is a required part of the pager contact information.
Username
The contact's account name as defined in the VTScada security system. Operators will not be able to acknowledge alarms via text or email unless this is provided. Leave blank for any operator who should be notified of an alarm but is not expected (or allowed) to acknowledge it by email or text.
Time Zone
If one or more of the contacts are located in a time zone other than that of the alarm server, they may find it inconvenient or confusing to translate the time stated in the alarm notification to their local time. If the contact's time zone is provided, using this drop-down list, then they will receive a message that has been adjusted to their location for them.
The list uses the names built into the Microsoft Windows' Multilingual User Interface Pack.
Enabled
A simple check box controlling whether the contact is enabled. Delays and repetition rules do not apply to disabled contacts; those contacts are simply not notified.
A parameter expression can be added to any contact's Enabled field, allowing you to enable / disable a contact based on any expression that returns a 1 (enabled) or 0 (disabled). (See: Automated Tag Configuration) Expressions must be added to contacts individually. There is no way to apply one expression to several contacts, other than to copy / paste.
Delete
Click the X at the right of each row to delete that row.
If an operator’s contact mode has been set to email and a badly formatted email address has been entered, then the following warning dialog will be displayed:
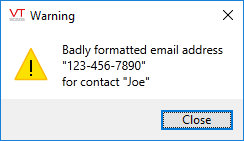
Click on the Close button and correct the email address before proceeding. The Roster tag will not permit you to save a badly formatted email address.
Roster properties Settings tab
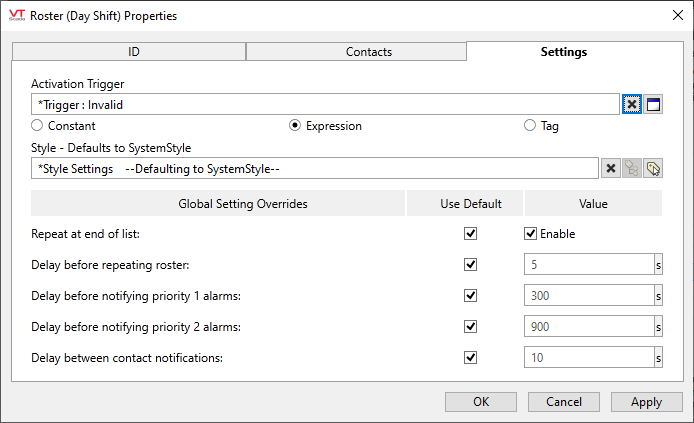
Activation Trigger:
For any given area (including "Default") one roster, and only one roster, is always active. Activating a roster automatically deactivates all other rosters that share the same area.
You can draw a roster as a Make Active button to allow user control but many sites prefer to automate the process of switching rosters by using a Trigger Tag. Note that if using a Trigger tag, in addition to setting the On time, you should also set an Off time 30 seconds later. This will not deactivate the Roster, but will allow the next On time trigger to occur.
Style
When this tag is represented on screen by widgets that can use a Style Settings tag, you can save development time by choosing the Style Settings tag that holds the correct display configuration for this tag instance.
The default configuration will use System Style, the default style tag that is automatically part of every new VTScada application.
Global Setting Overrides
Settings in this section are typically set globally using the Alarms Tab of the Edit Properties Page but can be overridden for each roster.
Repeat at end of list
When Use Default is selected, repetitions of the list are controlled by the property EnableRosterListRepeat. You can choose to override that property on a roster-by-roster basis. You can also use the Enable selection to control whether this roster will repeat.
The behavior that is in effect is shown at the bottom of the contact list:

Delay before repeating roster
Applies only when you have chosen to repeat the entire roster. This is the delay in seconds before starting a repetition. (RosterListDelay)
Rather than repeat the entire roster indefinitely, you can use a Delay/Repeat rule within the contact list to set a defined number of repetitions.
Delay before notifying on priority 1 alarms
Overrides theCallOutDelay1 setting for this roster.
Delay before notifying on priority 2 alarms
Overrides the CallOutDelay2 setting for this roster.
Delay between contact notifications
Overrides the RosterDelay setting for this roster.
In legacy versions of VTScada, this controlled the delay between contact notifications. It is now used only as a default when defining delay rules in the notification list. If there is no explicit delay between entries in the contact list, then there is no delay between attempts to contact those operators.
The following widgets are available to display information about your application’s Roster tags:
