
Not counted towards your tag license limit.
Alarm tags are used to establish rules for when an alarm should be triggered, and what behavior should occur. An Alarm tag monitors the value of another tag and triggers an alarm when that tag’s value reaches or passes a given set point.
The Setpoint property can be a user-defined number or it can be supplied by another tag’s value. The two values are compared using an operation such as greater than, equal to, or less than. If the result of this comparison is determined to be true, then the Alarm tag will be triggered.
The value of the Alarm tag itself becomes 1 while the alarm is on the active list. Otherwise, the value of the Alarm tag is 0. Note that trip alarms and event alarms never appear on the active list and therefore will always have a value of zero.
The urgency of the alarm (from Event to Critical) is defined by the Alarm Priority tag selected in the Alarm tag’s properties.
Alarms can be configured such that, if they are acknowledged by an operator, but remain active for a set length of time (that is, the triggering condition for the alarm remains in effect), the alarm will go back to an unacknowledged condition, thereby re-activating any audible and visible warning indicators that are attached to that alarm.
Note that shelving or unshelving an alarm is an operational action, not a configuration change.
Alarms should be matched to alarm databases when the application is created. If an alarm is switched from one database to another, you will lose access to the portion of the alarm's history that was recorded using the first database.
The selection of which alarm database to use is based on each tag's position in the tag hierarchy. Alarms are matched to the closest AlarmDatabase tag ancestor in the hierarchy, defaulting to the built-in System Alarm DB if no other database ancestor is found.
An alternate AlarmDatabase can be configured within the Alarm tag.
Trip Alarms Versus Level Alarms
Alarm tags can be configured as either "Trip" or "Level".
A level alarm will show up in the Active List as long as the underlying trigger condition remains true. The underlying condition must be cleared before the alarm is removed from the list of Active alarms.
The opposite of "Active" is not "Inactive". The opposite is "Normalized".
Trip alarms do not have an Active or Inactive status. After being triggered, the trip alarm is simply in an alarm condition, waiting for operator acknowledgment. A trip alarm will not be displayed in the list of Active alarms. They are primarily used in situations where the momentary existence of an alarm condition should "trip" the alarm, after which the state of the trigger is irrelevant.
Level alarm example
An alarm is set to be triggered when the pressure within a tank rises above X. This happens and the alarm is now both current and active. But before the operator acknowledges the alarm, they fix the problem by relieving pressure so that it falls below the setpoint (plus deadband if one is in use). The alarm has now normalized and is no longer shown in the list of Active alarms, but it remains Current and must still be acknowledged.
With a level alarm, you know from the triggering tag's value whether there is still an active (dangerous) situation.
Trip alarm example
An alarm is set to be triggered when a door is opened and the security code is not entered. But following this event, you cannot tell from the state of the door, whether the burglar is on the inside or the outside. A burglary could be as actively in progress with the door open as closed. This is a use-case for a trip alarm. The alarm has been tripped and is current. Checking the "Active" list for the state of the door is a waste of time and therefore trip alarms are not shown in the list of active alarms.
Use a trip alarm when the triggering tag's value does not tell you whether there is still an active (dangerous) situation.
The important point is that both types of alarms are equally alarms. The fact that trip alarms are not shown in the "Active" list does not mean that they have somehow been deactivated.
The ID tab of every tag includes the same common elements: Name, Area, Description, and Help ID.
Name:
Uniquely identifies each tag in the application. If the tag is a child of another, the parent names will be displayed in a separate area before the name field.
You may right-click on the tag's name to add or remove a conditional start expression.
Area
The area field is used to group similar tags together. By defining an area, you make it possible to:
- Filter for particular tag groups when searching in the tag browser.
- Link dial-out alarm rosters to Alarm tags having a particular area.
- Limit the number of tags loaded upon startup.
- Filter the alarm display to show only certain areas.
- Filter tag selection by area when building reports.
When working with Parent-Child tag structures, the area property of all child tags will automatically match the configured area of a parent. Naturally, you can change any tag's area as required. In the case of a child tag, the field background will turn yellow to indicate that you have applied an override. (Orange in the case of user-defined types. Refer to Configuration Field Colors).
To use the area field effectively, you might consider setting the same Area for each I/O driver and its related I/O tags to group all the tags representing the equipment processes installed at each I/O device. You might also consider naming the Area property for the physical location of the tag (i.e. a station or name of a landmark near the location of the I/O device). For serial port or Roster tags, you might configure the Area property according to the purpose of each tag, such as System or Communications.
You may define as many areas as you wish and you may leave the area blank for some tags (note that for Modem tags that are to be used with the Alarm Notification System, it is actually required that the area field be left blank).
To define a new area, type the name in the field. It will immediately be added. To use an existing area, use the drop-down list feature. Re-typing an existing area name is not recommended since a typo or misspelling will result in a second area being created.
There is no tool to remove an area name from VTScada since such a tool is unnecessary. An area definition will exist as long as any tag uses it and will stop existing when no tag uses it (following the next re-start).
Description
Tag names tend to be brief. The description field provides a way to give each tag a human-friendly note describing its purpose. While not mandatory, the description is highly recommended.
Tag descriptions are displayed in the tag browser, in the list of tags to be selected for a report and also on-screen when the operator holds the pointer over the tag’s widget. For installations that use the Alarm Notification System, the description will be spoken when identifying the tag that caused the alarm.
The description field will store up to 65,500 characters, but this will exceed the practical limits of what can be displayed on-screen.
This note is relevant only to those with a multilingual user interface:
When editing any textual parameter (description, area, engineering units...) always work in the phrase editor. Any changes made directly to the textual parameter will result in a new phrase being created rather than the existing phrase being changed.
In a unilingual application this makes no difference, but in a multilingual application it is regarded as poor practice.
Help Search Key
Used only by those who have created their own CHM-format context sensitive help files to accompany their application.
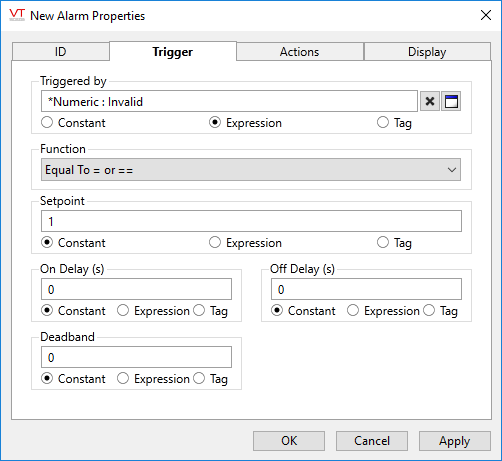
The Trigger tab for the Alarm tag properties folder consists of the attributes used to identify the conditions that the Alarm tag will evaluate to determine whether an alarm should be triggered.
The Triggered By field is used to select the tag that is being monitored by this Alarm tag. The Setpoint property displays a value (or a tag) that will be compared to the value of the tag being monitored (as identified in the Triggered By tab). The Function property selects the operation that is to be performed to compare the monitored tag's value with the Setpoint value.
Tag parameter expressions have "Optimize to only evaluate at tag initialization" selected by default.
Do not deselect this option for alarm parameter expressions. Do not use non-optimized expressions for alarm parameters.
Triggered By
Select the tag whose value will be monitored and compared to the value of this Alarm tag's Setpoint value to determine if this alarm should be triggered.
The Triggered By field can be used to associate this Alarm tag with a new or existing numeric tag using the tag browser button to its right. The Triggered By field can be cleared of its current value using the X button to its right.
Right-clicking the name of the I/O tag that has been selected in the Triggered By field opens the tag properties folder for the selected communication driver tag.
While the link can be made using either the Expression or the Tag option, this alarm will not show up in a trend plot of the triggering tag if the link is made using an expression. If you specify the Triggered By tag directly then the alarm line will be shown. (Assumes that the pen in the HDV is configured to show alarms.)
Function
The Function drop-down list enables you to select one of 11 operators to use to compare the value of the Triggered By tag with the Setpoint value configured for the Setpoint field to determine if there is an alarm state.
Mode
Three modes are available:
Standard
The alarm watches the value of the Triggered-by tag or expression. This is how alarms have always worked prior to version 12.1.
Unconfirmed Write
Also referred to as "Failure to Operate". Set the Function to "Equal to" and the Setpoint to 1. Use only as a Trip alarm and always set an On Delay. Will not work if Triggered-by is set to an expression, or with any tag type other than I/O and Calculations. Does not work with memory tags or calculated outputs.
The alarm will trip if the triggered-by tag writes a value and, after a delay, its feedback value does not match the written value. This assumes that you have configured a feedback value for the triggered-by tag.
Unexpected Change of Value
Also referred to as "Unexpected Change of State". Set the Function to "Equal to" and the Setpoint to 1. Use only as a Trip alarm. Will not work if Triggered-by is set to an expression, or with any tag type other than I/O and Calculations Input tag.
The alarm will trip if the triggered-by tag receives a feedback value that is different from the last value that it wrote out. The intent is to trip an alarm if the value in the PLC is changed by a method other than the triggered-by tag. This alarm is expected to be set to Trip.
Setpoint
You must provide a setpoint to configure an alarm. The alarm will trip or activate when the triggering value matches the setpoint, according to the rule set by the selected function.
The valid value for the Setpoint field can be provided via any of a constant, an expression, or a tag. Please see Constant, Expression or Tag for help selecting which to use.
Deadband
The Deadband field specifies how far the triggering value must return into the safe zone before the alarm is no longer considered active. Deadband values are used in systems where analog values fluctuate often, sometimes providing a false data reading.
On Delay
Use the On Delay field to specify a length of time (in seconds or in fractions of a second) that the system will wait before triggering this alarm. This enables you to disregard transient spikes in value as the tag must remain in an alarm state for the amount of time specified in the Delay field before an alarm will be indicated.
Off Delay
Similar to the On Delay, the Off Delay field can be used to specify a length of time (in seconds or in fractions of a second) that the system will wait before the alarm will return to the normal state. (The triggering condition is no longer true).
This enables you to disregard transient spikes in value that may occur after an alarm has been activated. The Off Delay does not apply to trip alarms, which do not have an active state.
The Actions tab for the Alarm tag properties folder enables you to select an Alarm Priority tag whose of properties will be used to indicate the category of alarm to be triggered by this Alarm tag (see Alarm Priorities). Other properties available on the Actions tab allow you to disable the alarm in the event that alarm conditions could be triggered due to routine equipment maintenance or another interruption in communications of which you are aware. The sound to be used for the alarm siren for this alarm can also be indicated here.
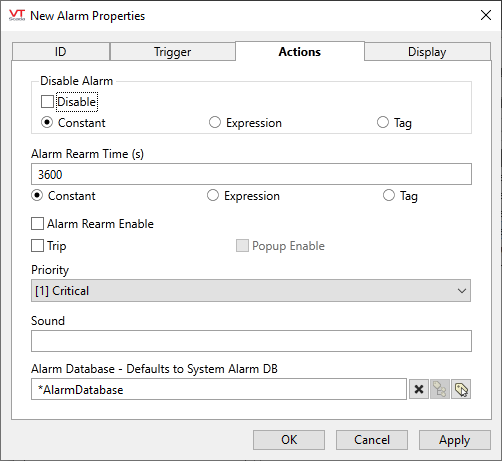
Disable Alarm
Use this check box to disable or enable this Alarm tag. Disabling an alarm is a configuration action and usually done within the properties dialog.
If an Alarm tag is drawn on a page, users who have the Alarm Disable privilege but not the Tag Modify privilege will be able to disable that alarm using the right-click menu.
Users familiar with VTScada from before version 12.1.28 may expect to see an option to set an expression or tag for disabling an alarm. For that, use Suppress.
Suppress
Create an expression or select a tag that will suppress the alarm when TRUE and unsuppress it when FALSE.
Alarm Rearm Time
Applies only if Alarm Rearm Enable is selected for this alarm. If the alarm has been acknowledged, but remains active for the time shown in this field, the alarm will return to the unacknowledged state. Audible and visible warnings configured for this alarm’s priority level will again be displayed. The Alarm Rearm Time is measured in seconds, and defaults to 3600 (1 hour). The value in this field must be greater than 0.
Alarm Rearm Enable
Controls whether this alarm will revert back to an unacknowledged state if it remains active for the length of time set in Alarm Rearm Time, after having been acknowledged by the operator.
Trip
Choose whether this alarm is a trip alarm or a level alarm, as described in the introduction to this tag.
Priority
Set the priority of this alarm by selecting an Alarm Priority tag. The built-in Alarm Priority tags have numbers from 0 to 4 with the following meanings:
- None.
- 0 (event) - the alarm will not occur, but its value may still be used as a set point by other tags.
- 1 (critical) - the highest priority alarm.
- 2 (high) - a regular priority alarm.
- 3 (warning) - warning.
- 4 (notice) - a notice or informational event. Logged in the event history, but otherwise silent.
You may also create your own Alarm Priority tags.
Sound
Identify what audible warning will be played when this alarm is triggered. The Sound field can be set to a 0, a 1, or to the name of a .WAV sound file to be played.
If the Sound field is set to 0, no sound will be played when this alarm is triggered.
If the Sound field is set to 1, the sound configured in the associated Alarm Priority tag will be played.
If the Sound field identifies the name of a .WAV sound file, it will override any alarm sound configured for the associated Alarm Priority tag. When specifying a sound file, you must enter its name and extension (e.g. MySound.wav). The specified sound file must be a .WAV file, and must be stored in the application directory. If the specified sound file is not found, the alarm will revert to using tones as specified in the associated Alarm Priority tag.
Alarm Database
This tag will be auto linked to the closest ancestor or else sibling Alarm Database tag and the hierarchy. If none found, it will use the System Alarm Database.
Use this parameter to link the tag to an alternate Alarm Database of your choice.
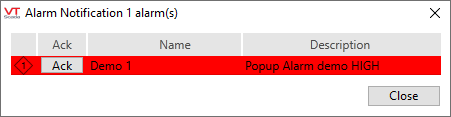
Pop-up Enable
If the configuration variable AlarmPopupsEnable is set to 1, then selecting this option will result in a pop-up dialog being displayed whenever the alarm is triggered. The variable can be set using a check box within the Application Configuration dialog, Alarms tab.
The pop-up will display the names of all active alarms for which the Pop-up option has been selected. As alarms are acknowledged, they will be removed from the pop-up. Should all the alarms be acknowledged while the pop-up is displayed, it will close. You may close the pop-up at any time by selecting the Close button. The pop-up will not be displayed again until a fresh alarm event occurs.
When this tag is represented on screen by widgets that can use a Style Settings tag, you can save development time by choosing the Style Settings tag that holds the correct display configuration for this tag instance.
The default configuration will use System Style, the default style tag that is automatically part of every new VTScada application. If a Style Settings tag is an ancestor or else a sibling, it will become the new automatic default.

An alarm tag has a value of zero or one, depending on whether the alarm is on the active list (one for active). The alarm tag may therefore be drawn as if it were a digital status. Note that trip alarms are never in an active state and therefore will always have a value of zero.
The following widgets are available to Alarm tags:
