Selector Switches (Tutorial)
A switch is another type of control. It can be similar to an I/O and Calculations tag in the digital data type, but has several different features.
| Digital I/O tags | Selector Switch tags |
|---|---|
|
Can write a binary value (0 or 1). |
Can write any value. |
| Writes to a single address. | Can write to a single address for each switch position or a different address for every switch position. |
| The value to write comes from the user control widget, or from the Read Address in the I/O tag. | The value to write for each position is configured in the tag. Users select only positions for the switch. |
|
Can be configured to expect value feedback for each position. Can be configured to expect position feedback, matching each position. |
|
| Can have a data source (Read Address) for automated control. (Rarely used because that's what PLCs are for.) | Cannot perform automated control. |
Selector Switch Tags are most commonly used for On/Off switches and for Hand-Off-Auto (HOA) controls. This tutorial creates only a three-position HOA control, but you could also replace the Inflow Valve with a two-position switch if you want extra practice.
Position feedback versus value feedback
Neither is required. A switch will operate without feedback.
- Use position feedback if you want the switch widget to provide a visual signal that the selected position does not match the actual position, which might have been set on-site.
It will do so by blinking between the selected position and the actual position based on the feedback value. Position feedback must have a value that matches the position; 0, 1 or 2. - Use value feedback if you want to trigger an alarm when the selected position does cause a desired result in the controlled hardware. This is often the position selection, but may be anything.
Value feedback is not limited to values matching switch positions, and may be configured with any value that is to be expected for each switch position.
The following exercise assumes that you have completed all the tutorial lessons prior to this in the menu. If so, ignore this note and continue.
If not, you can still do this exercise. Load the Training Simulator, as described in Add Applications (Tutorial). Navigate to the Sample Pages >> Demo Page and follow the instructions there to enable the Demo System tags. You will need to make adjustments in the exercise steps since the path to the tags won't be the same, and the Demo System has been built to a state that may not match that of the previous chapter in this tutorial.
Preparation
According to the notes above, feedback of any sort is not absolutely required by a Selector Switch. But the simulator does provide position feedback on holding register 40041, so we might as well use it.
- Open the Tag Browser.
- Navigate to find Pump 1 and right-click on it to open the pop-up menu.
- Select New Child from that menu.
- Select I/O and Calculations as the type.
- Name the tag Switch Position.
- Set the description to Position feedback.
- Set the type to Discrete.
- In the Equipment Type field, type HOA
- Select the I/O tab.
- Set the Read Address to 40041.
- Ensure that the Write Address is blank.
- Select the Scaling tab.
- Ensure that the two Process Data Min values (unscaled and scaled) are 0.
Ensure that the two Max values are identical to each other, whether 2 or 100 (not 0). - Select the Display tab.
- Ensure that the Engineering Units field is blank.
- Click OK to save your work and close the properties dialog.
After a moment, the value should show as 2 (or "State 2"), indicating that the switch is in the Auto position.
The value of this tag should be 2, which corresponds to "automatic mode". If there is a number other than 2, check your scaling values.
Create a three-position Selector Switch
- Continuing to work in the Tag Browser, right-click on Pump 1 to open the pop-up menu.
- Select New Child.
- Open the "Outputs" tag group.
- Select the Selector Switch.
- Name this tag HOA
(... for Hand-Off-Auto. The fact that it's a child of Pump 1 tells us what it's for.) - Set the description to Motor control.
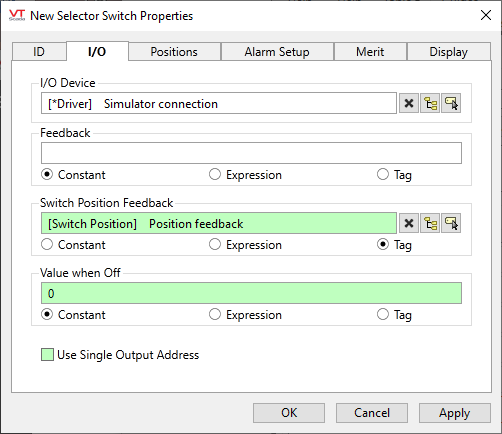
- Select the I/O tab.
- Under Switch Position Feedback, select the Tag option.
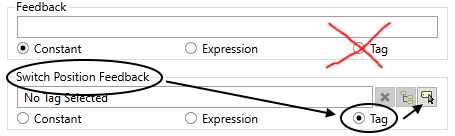
- Select the Tag Browser button as shown.
A second instance of the Tag Browser opens. - Right-click on Switch Position to open it's pop-up menu.
- Select the word, "Select".
The second instance of the Tag Browser closes. - Deselect the option, Use Single Output Address.
For each position, Hand, Off, Auto, the tag will write to a different address.
The Value when Off parameter is now enabled. - Type a zero 0 in this field.
This is the value that will be written to each address that is not selected. - Select the Positions tab.
- Note the first two parameters:
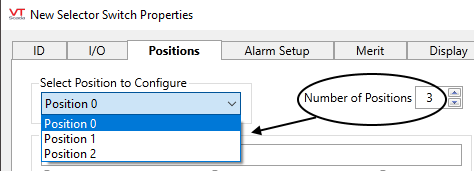
You are configuring a 3-position switch (Hand-Off-Auto). Each of those positions, numbered 0, 1, and 2 must be configured. Continue...
- For Position 0:
- Set the Output Value to a constant, entering the number 1
- Ensure that the Label is Hand
- Set the address to 4
- For Position 1:
- Again, set the Output Value to a constant, entering the number 1
- Ensure that the Label is Off
- Set the address to 5
- For Position 2:
- And again, set the Output Value to a constant, entering the number 1
- Ensure that the Label is Auto
- Set the address to 6
- Click OK to save your work.
- Close the Tag Browser.
Draw a Selector Switch widget
- Open the Idea Studio
- In the Widgets palette, to the left of the studio, select the home button.
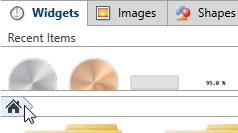
- Open the Buttons & Switches folder.
- Drag the Selector Switch widget to the page, placing it near the pump.
- Right-click on the widget you just placed to open its pop-up menu.
- Select Link from that menu.
The Tag Browser opens.
It opens to the top level. Rather than search for the tag you created in the last set of steps, use a shortcut as follows. - Select the Show Children option.
All selector switches in the application are shown. Because there is only one, it's a very short list. - Right-click on HOA to open its pop-up menu.
- Select the word "Select".
- The Tag Browser closes and the widget is now linked to your Selector Switch tag.
- Close the Idea Studio.
You should now be able to operate the pump. Remember that the simulator takes a moment to respond to operator input. If you switch between several positions too rapidly, it is unlikely to catch up. Switch back to the original position, wait for the blink to stop, then switch to the new position. Give the simulator a chance.
If you switch to Hand, the tank will empty, assuming that you have not slowed the motor to drain the tank slower than the inflow rate.
If it empties and you allow the motor to continue running, it (the motor) will fault (overheat), and the tank will refill.
After faulting the motor, you must turn the switch to OFF in order to reset.
Ready to continue? Open Alarms (Tutorial)
