Basic Wizard Engine Module
Use only the Wizard Engine methods. Do NOT add your own state transition logic for the states controlled by the Wizard Engine.
The Wizard has a few special requirements:
- The first step of the Wizard user interface must correspond to the first state in the module.
- The Wizard must launch a copy of \WizardEngine into its own scope. It will need to retain the Object value to access the helper modules.
- Several variables will be required to be passed to the instance of \WizardEngine for control of the actions of the Wizard.
- The Wizard must have a state named, "Finish". This is not necessarily the final state in the Wizard, but is the final step of the user interface. As many additional states as are required to perform the Wizard's completion tasks may come after the "Finish" state.
- If the Wizard is to perform Tag configuration, it may be useful for the Wizard to be instantiated with a suitable Parms array and a Root variable so that it can impersonate a tag instance.
In practice, the Wizard module starts at its first state and is then navigated between its various states by the controlling WizardEngine, which responds to the user's use of the "Next" and "Back" buttons, as well as providing the programmatic flow control. After the Wizard reaches its "Finish" state, and the user presses the "Finish" button, the Wizard then does whatever is required to perform its required operations. There is no going back from this point. The Wizard must complete its task. All necessary validation must be performed prior to the Wizard reaching the Finish state.
The Wizard has to launch a copy of the WizardEngine on entry to its first state, typically:
<
{========================= Wizard ===========================}
{ The Wizard serialization module.                          }
Wizard
(
  Parms;
)
[
  Protected Engine    { Instance of the WizardEngine        };
  Protected Trig      { Trigger for input field completion  };
  Protected Msg       { Current message to display          };
  {                                  }
  {  Other variables as required... }
  {                                 }
]
The Wizard Engine has the following parameters:
- WizardName: A text value setting the name for this particular Wizard.
- WizBmp: An image value of a graphic that will be displayed at the first and last steps of the Wizard (see the notes later in this topic for sizing information).
- pState: A pointer to a variable that is set by the WizardEngine to the name of the next state that the Wizard should execute.
- pMove: A pointer to a variable set by the WizardEngine as a trigger when the Wizard is required to change states. The actual value of the trigger provides further information, if required, about the direction of movement, and so forth.
- pClose: A pointer to caller's close flag - set by engine.
- pTitle: A pointer to the caller's current title string. This will be displayed in the header.
- LogoBmp: An image value of a graphic that will be displayed at the RHS of the header bar. If Invalid, the VTScada logo will be shown.
- AppName: A text value that will be displayed as the initial title and at the bottom left of other screens. Defaults to the current application name if invalid.
Init [
  If !Valid(Engine);
  [
    Root = Self();
    Engine = Launch(Scope(\Code, "WizardEngine"), Self, Self,
                GetDefaultValue(FindVariable("Title", Self, 0, 1)),
                MakeBitmap(FileFind("C:\VTScada\Resources\WizVTS.jpg", 0)),
                &nextState,
                &Move,
                &Close,
                &WTitle);
  ]
  WTitle = ConCat("This wizard is a template for a new Wizard.",
                  CRLF, CRLF, CRLF, CRLF,
                  "Press NEXT to continue");
  If Move;
  [
    Move = 0;
    ForceState(NextState);
  ]
]
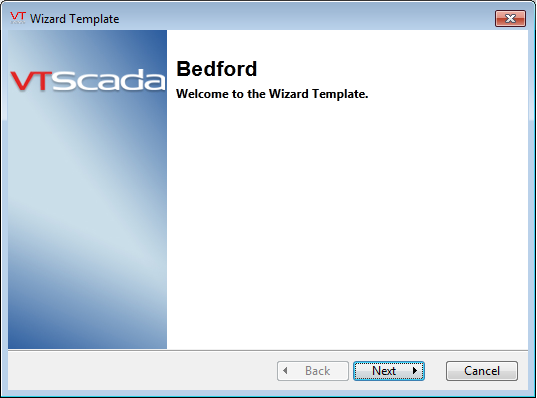
The sample code above, running in a page titled "Wizard Template" in an application named "Bedford" produces the following result.

The example above is only a portion of a wizard module.
VTScada includes a wizard template that has been provided to assist programmers in creating their own wizards. This template is installed with the VTScada software, and can be found in the Template directory within the VTScada installation directory: C:\VTScada\Example\Wizard.src.
With regards to the image above:
- The image is scaled so that its height fits the vertical space between the title bar and the bottom bar. The aspect ratio then determines the positioning of the RH panel. To avoid distortion, it is best to size the image exactly. The bottom bar is 40 pixels high.
- The large title "Bedford" comes from the "AppName" parameter.
- In this instance, the "WizardName" parameter is "Wizard Template" (obtained from the DisplayManager page name), and this string is used in the window caption and the "Welcome to…" message.
- The remainder of the text comes from the variable addressed by the pTitle parameter. Note the use of CRLF (defined as:
Constant CRLF = Concat(MakeBuff(1, 13), MakeBuff(1, 10));
to achieve vertical spacing).
Let's review the state code:
If Move;
[
   Move = 0;
   ForceState(NextState);
]
This is the basic Wizard control. When the Next button is clicked, the variable "Move" (the "pMove" parameter to the WizardEngine) will be set to non-zero, and the variable "NextState" (the "pState" parameter to the WizardEngine) will be set to the name of the next state to be used. So, the remaining code for a simple Wizard could be:
StateTwo [
   WTitle = "We are at the second step.";
   If Move;
   [
      Move = 0;
      ForceState(NextState);
   ]
]
ThirdStep [
   WTitle = "We are now at the third step.";
   If Move;
   [
      Move = 0;
      ForceState(NextState);
   ]
]
Finish [
   If Move;
   [
      Move = 0;
      ForceState(NextState);
   ]
]
DoLotsOfWork [
  If 1 MoreWork;
  [
.. .. .. .. ..
Note that a title is not required for the "Finish" step, as the WizardEngine generates standard text.
