Idea Studio (Tutorial)
The Idea Studio is where you build the user interface for your application. It contains many tools, but it's not meant to be a complete paint or CAD program. The point of SCADA is to monitor and control. The more basic the user-interface, the better, so long as the information is clear. In fact, there's an entire school of thought about high performance, human machine interface (HP/HMI) design. If you search for that term on the world wide web, you'll find lots to read.
VTScada does not force you to use any style or design for your user interface pages. If you want a bright and friendly user interface, go ahead. If you want a strict HP/HMI design, you can build that instead. We're not going to tell you how to design your screens, we just provide a great selection of tools so that you can build what you want.
Open the Idea Studio with this tool in the application window:

Open the Idea Studio by clicking the button shown circled.
Basic layout:
- A toolbar is always present across the top of the Idea Studio window. Which toolbar is open depends on what task you are doing. It will change to show relevant tools.
- Down the left side of the window are three overlapping palettes: Widgets, Images, and Shapes. Only Widgets can be linked to tags to display values. Images and Shapes are only to provide visual context for the Widgets.
- Down the right edge of the window are three overlapping panels: Tag-Links, Multi-Image Widgets, and Layers. You can open and close panels as needed using a tool in the "Home" ribbon, or by dragging the edge of the screen. Two open automatically when relevant, but you can choose to override that.
- Across the bottom of the window are tools to zoom in and out, open or create pages, and show the coordinates of anything selected on a page.
This tutorial lesson is not going to attempt to describe all the feature in the Idea Studio. You can read about those here: Display Building (Idea Studio). Instead, we are going to focus on doing a few basic tasks.
Every new VTScada application has a page named "Overview" for you to use as a starting point. You can use the File menu to create more pages as needed.
Everything that is on the Overview page in a new application is there to welcome new users. Your first task will be to delete everything so that you can work with a clean page.
The following exercise assumes that you have completed all the tutorial lessons prior to this in the menu. If so, ignore this note and continue.
If not, you can still do this exercise. Load the Training Simulator, as described in Add Applications (Tutorial). Navigate to the Sample Pages >> Demo Page and follow the instructions there to enable the Demo System tags. You will need to make adjustments in the exercise steps since the path to the tags won't be the same, and the Demo System has been built to a state that may not match that of the previous chapter in this tutorial.
Clear the Overview page
- Ensure that the Overview page is open in the application.
- Open the Idea Studio.
The Overview page will open for editing. - Press the keyboard combination Ctrl + A.
This should select everything on the Overview page. - Press the Delete key on your keyboard.
That's it. You now have a clean page.
The next step is to create a widget that shows the current state (running or stopped) of the pump. There are many widgets that can do that, but one of the equipment widgets is probably the best choice here.
On the left side of the screen, the Widgets palette should be open at the top (home) level. If not...
- Select the word "Widgets".
- Select the Home indicator.
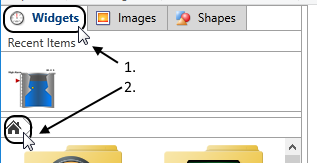
- Within the Widgets palette, select the Equipment folder to open it.
Depending on the size of your screen, you may need to scroll to see it. - Within the Equipment folder, select the Pumps folder to open it.
- Find PumpLarge02
(You're welcome to use any of the pumps. That's just the one shown in these examples.) - Select and drag it to the page.
If you hover the pointer over that image on the page (not the palette), you'll see an interesting tooltip:

Linking widgets to tags is a crucially important step.
(By the way, there are tools for reminding you if you have any unlinked widgets in a page. See: Unlinked Widgets and Tag Links Panel)
- Right-click on the widget that you placed on the page.
(That's the one on the page, not the one within the palette menu).
A pop-up menu will appear, the second option of which is Link. - Select the Link option from the pop-up menu.
A new Tag Browser window will open. - Navigate your way through Station 1 >> CommChannel >> Pump 1 to find and select Running.
(You can click on Running, then use the Select button at the bottom of the Tag Browser.
Or, you can right-click on Running and click Select from the pop-up menu that opens.)
That's it. The widget now shows you the current state of that I/O tag.
Next , you'll draw the analog Level. The steps for that will show you a different technique, just for comparison.
Draw a Vertical Analog Bar widget
The Analog Bar is a relatively new widget in VTScada. This can be used to display any Analog value, but works best with an I/O tag. If the tag has values set for the expected range, the bar will show those as a shaded area. You can also display a shaded range within the bar that represents values for the past N minutes, and you can display an arrow to indicate whether the value is up or down relative to where it was M minutes ago.
- Open the Tag Browser.
- Navigate to find the tag "Level".
(Station 1 >> CommChannel >> Level) - Right-click on the tag to open the pop-up menu.
- Select Draw from the pop-up menu.
The Idea Studio opens to the most recently used page.
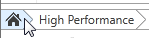
A pop-up palette opens in front of the Idea Studio, containing only widgets that are suitable for the type of tag you are drawing, an analog I/O in this case. - In the pop-up palette, select High Performance folder.
- Ensure that the current page in the Idea Studio is Station Status.
- Drag a Vertical Analog Bar and Indicator widget to the page.
The Tag Browser will re-open in front of the Idea Studio. Close the Tag Browser, but leave the Idea Studio open.
- Right-click on Level again to re-open the pop-up menu.
- Select Draw again.
- In the pop-up palette, navigate back to home.
- Select the Text folder to open it.
Be careful. There are nine text widgets. Read the next step carefully before doing. - Select the widget labeled "Numeric Value" and drag it to the page.
- When the Tag Browser reopens, close it.
Don't minimize it. Close it.1
There is still much to learn about the Idea Studio and configuring the widgets that you've drawn, but that's enough for this chapter.
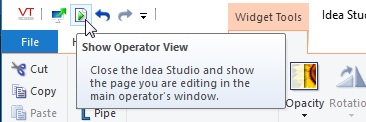
Close the Idea Studio by clicking the Show Operator View button at the top:
Wondering about all those question marks on your widgets? Turn to the next lesson in the tutorial...Questionable Data (Tutorial)
