
Widgets are linked to tags. Properties of those tags can therefore be accessed and displayed in the widget.
In the majority of cases, the only property that is used is the tag's value, but you can link any property of any tag to any display property of anything within any tag widget that you create.
For example, you could:
- Set the color of an object based on Area - Objects in the East area will be green and objects in the West area will be purple.
- Tie the opacity of an object to a child tag's Start Tag expression. If the tag doesn't start, the object doesn't show. (Setting a widget's opacity to zero is roughly equivalent to disabling that widget. The code for the widget just doesn't run.)
- Change the scale of an object based on an analog tag's scaled max property.
- Create a label to match the name, area, and description of the linked tag.
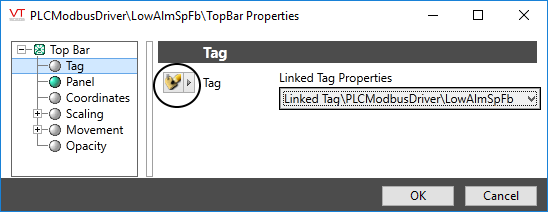
If you examine the properties of any child widget, you'll discover that the data source selector has a new symbol, as circled in the following image:
Suppose that you decide to add a new VTScada widget to your custom tag widget. Perhaps it's a Numeric Value so that an Analog Status is displayed as a number as well as a moving indicator. You can do this simply by dragging a Numeric Value to the widget, just as if you were drawing one on a page. But, you absolutely must not link that new widget to any tag.
Instead:
- Open its properties dialog and click the arrow for the data source selection:
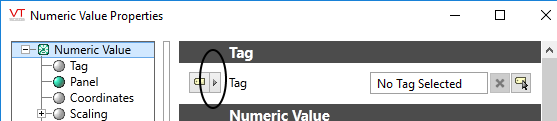
The data source selection arrow.
- Choose the option, Linked Tag Property
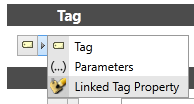
Selecting the Linked Tag Property data source. Other options, not shown here, may be available.
- Expand the Linked Tag Property selection and navigate through the child tags to select the one you want. In this example the "Linked Tag" is a custom type and the Analog Status is a child of a child of that type.
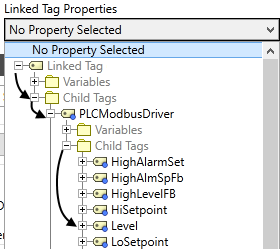
Selecting a child tag of the linked type.
The result is that the widget can be used for the Level of any instance of the custom tag structure.
One common example is to display the tag name or description as a label within the widget. You might also choose to display the area value, create a calculation that uses the tag's minimum and maximum scaled values, or add the engineering units to the display.
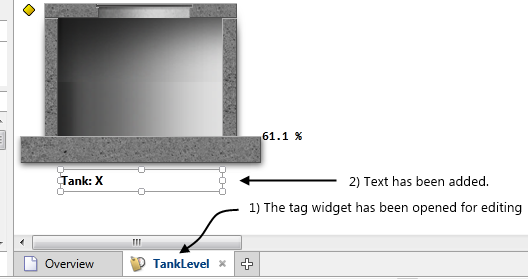
Example: Configure a text label to display the description field of the linked tag.
Prerequisites: This procedure applies only to tag widgets. The tag widget must be open for editing in the Idea Studio. Text has been added to the widget as a label.
- Open the properties dialog of the text label.
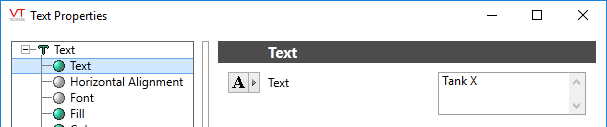
- Click the button as indicated. This provides access to a selection of data sources for the text to display.

- Choose the option, Linked Tag Property.
The text input field will be replaced with a drop-down list of tag properties. The list of possible properties comes from the list of types that the widget can be linked to.
- Expand the list to find and select Description.
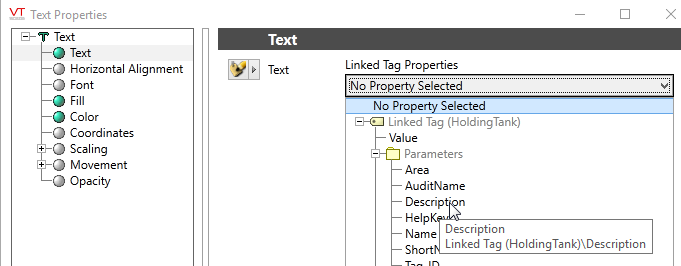
Each instance of the widget will now show the description field of the tag to which it is linked. Note that this works, even though you did not use an expression with \GetPhrase().
You might want the property to be only part of the label, or to create an expression that uses the property. After following the procedure described in the example, you can change the data source to Expression. You will find that the expression for the linked tag property is "Root\Property_Name". Use this in an expression as required.
Take care: this information is for widgets linked to tags, not for parameter expressions in general. Here, "Root" refers to the current Drawn Tag Context. Use only when working with properties of a tag widget.
For example, to display the current tag's area value as part of the label "Tank in area: X", the process is:
- Create a parameterized phrase. (Multilingual Expressions, on page 1)
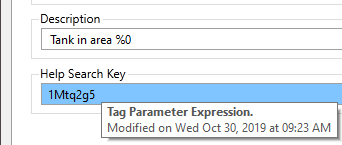
The expression is "Description", which returns the
phrase key for the text shown in the Description parameter.
- Use that phrase key in your expression and hand in the root tag's Area property for the parameter.
\GetParmPhrase("1Mtq2g5", \Root\Area)
Opacity Versus Linked Tag Properties
You were able to hide the Numeric Value widget based on whether the Flow had started because it is a child of a parent tag that is still there and running. Also, you were working with an I/O tag, which has a Started property.
Trying to do the same thing with the overall widget for your CustomPump (as an example) would be more complicated. First, user-defined types do not have a Started property or variable. Instead, you would need to refer to the Tag_Start_Condition property. But if the tag doesn't start, then that's neither 0 or 1 - the tag effectively doesn't exist at all. What you're likely to get instead is an unlinked widget, not an invisible one.
